Stagger Menu Animation with Squarespace 7.1
Today I’m going to show you how you create a really cool staggered animation for your menu in Squarespace 7.1.
You’ll be able to control the timing and the delay/offset for the animation.
Here’s what we’re going to be making:
Rather than just have them fade in all at once, we’re going to add a slight transition/delay to each item in the menu so that elements animate one at a time instead of all at once. It’s a subtle effect but looks really cool.
Compare this this to how it looks when they all animate in at once:
Compatibility/Requirements #
- Squarespace 7.1 (for best compatibility. May work with 7.0 templates but no guarantees)
- Squarespace Business Plan
Why are we doing this with JavaScript? Can’t we just animate with CSS.
The reason why we’re using JavaScript to animate our header links is because we don’t always know how many links or items will be in the header.
You could have anywhere from 3-10 links (logo, page links, and social links) in your Squarespace navigation.
Although we can add delays to animations with CSS we’d have to manually add the delay to each element.
And if we wanted to change the animation delay we’d have to change it for each element. What if we add more elements? We have to go back in and add more delays. Not cool my friend.
But with JavaScript we don’t have to manually setup the delay per element.
JavaScript can get the total number of links and add the appropriate delay. And if we want to change the delay for all elements we only have to change it once.
With that out of the way let’s get started.
Step 1. Create a new script in Code Injection #
Everything we’re doing is going to go into the Code Injection (Settings -> Advanced -> Code Injection -> Footer). We’ll add a load event listener to make sure that our code only runs once the page is fully loaded.
Step 2. Get all the header elements #
Now we need to grab our links. We can write a simple variable to grab all of our header links.
This will grab all the links or <a> in the header as a collection and store them in the variable headerItems.
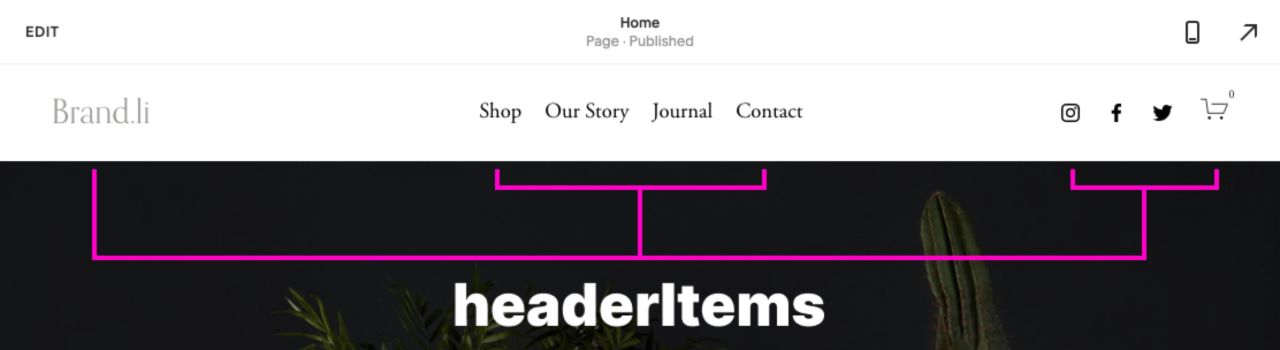
This includes the logo, main navigation links, and social/action links if they’re set. We’ll come back to this later in the tutorial.
Step 3. Writing the fadeIn animation function #
Next we’re going to write the function that will handle the animation and we’ll call it fadeIn
This will animate the opacity of the links from 0 to 1, which will cause them to “fade in”.
What’s going on in this function?
First lets talk about the parameters (element, time, and delay)
Think of these as your options that you set when you call the fadeIn function.
- element: this is the element that you want the fadeIn animation to be applied to. It could be any element but in our case we’re going to be giving it a header link.
- time: this is how long the animation takes to go from start to finish. The number that should be written is in ms, so if you want the animation to be 1 second, you’d write 1000 (1000ms = 1s)
- delay: this is the time that you want for the animation to be delayed. This is what will let you stagger the animation between elements.
If we wanted to run this function on a header link it would look something like this:
This is saying we’re going to run the fadeIn function on our header and the animation is going to run for 1s with 0 delay.
Next lets look at the variables inside the function: keyframes and timing
What Are Keyframes? #
Do any reading on animation and you’re bound to come across the term keyframes.
Keyframes describe how a property (i.e. opacity) should look at a certain point in time. In our example we’re defining how opacity should look at the start and end of our animation.
You could read the above as:
“At the start of the animation I want the opacity to be 0, at the end of the animation I want the opacity to be 1”
Next is our timing variable.
Here is where we setup the timing for our animation. How long will the animation take, and what will the delay be? If we wanted our animation to take 1s and to start immediately (i.e. no delay) this is what it would look like:
Finally at the end we animate our element and pass our keyframes and timing variable as arguments to the animate method.
element.animate(keyframes, timing)
So how do we animate every link in the header? Let’s look at that next.
Step 4. Apply the animation to all the header links #
We’re going to go back to step 2 and grab our header variable.
We need a way to use our fadeIn function on every link in the header. We can do that using JavaScript with a loop.
Loops are a big topic but the gist of loops is that they give you the ability to repeatedly run code until a certain condition is met.
It’d be like telling someone to count up to 10. Once they reach 10, they can stop counting.
This is what we’re going to be doing with our links and animation. Our loop will apply the animation to all the header links and once it reaches the last one it will stop.
Let’s create another function called animateHeader that will contain a loop that will take care of running the animation on all of our header links.
There’s a lot happening here, but the only part you have need to worry about is the last line which is where you finally run the animateHeader function.
If you want the fadeIn animation to take 1 second with a delay of 200ms between each you’d call the function like this.
Tips For Animation #
It’s easy to get carried away with animations. Animations are most effective when they’re subtle and don’t interfere with the user experience.
What would be an example of interfering with the user experience? In this case if the animation is really long (i.e. 10 seconds), the visitor would have to wait 10 seconds before the last link in the menu is visible.
Here’s an example of an animation that’s too long. Notice how long it takes for the last item in the navigation to appear.
Keep The Delay Between Animations Short #
Keeping the delay between animations short will give your animation a fluid appearance.
How short? A good rule of thumb is between 100-300ms.
If the delay is too long between animations then it can give the appearance of stuttering or being slow. Here’s an example with the delay set at 500ms.
Compare this to how it looks when we set the delay to 200ms.
Putting It All Together #
Now that you know some of the things to watch out for with animations it’s time to put it altogether and set the animation to your liking.
Here’s what the final script looks. Add this code to Settings -> Advanced -> Code Injection -> Footer and you’ll get a nice staggered animation effect on your menu.
Be sure to experiment :).